We take a look at the NEW Wulf 4K!
First Look
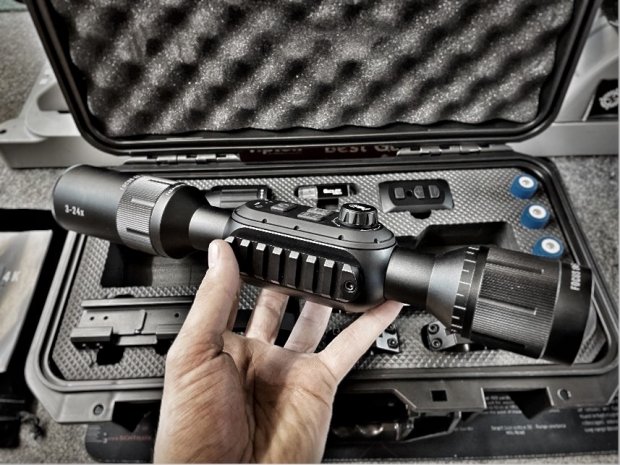
After a short wait for the Wulf 4K since it’s announcement in early August 2021, we’ve finally got our hands on this all-in-one unit! First impressions are good, the scope comes in a very substantial Peli-Style flight case, complete with padlock holes and pressure release valve. Upon opening the case, you’re presented with a well-made interior, Laser-Cut foam filled with accessories!
Comes with…
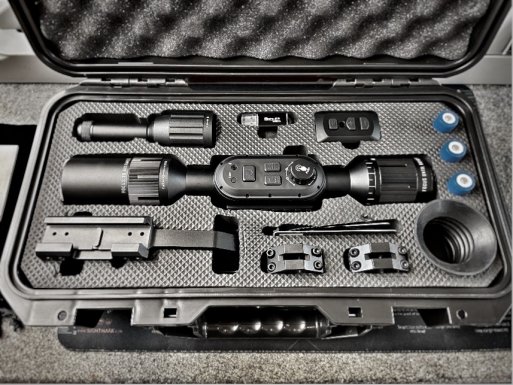
Laid into the precision Laser-Cut foam are a variety of different add-ons and accessories for the scope unit, from top left to bottom right we have; 1x IR850nm 5W torch (we’ll see how this does in the field), 1x USB Micro SD card adaptor, 1x scope remote control, under the remote is a picatinny ring for the IR torch, 3x 18650 2400 mAh Batteries with nipples for the IR Torch, 1x Wulf 4K Day/Night Scope (fitted with daytime reducer), 1x cantilever mount with tri-point picatinny rail, 2x 30mm picatinny rings, 2x allen key for the scope rings, 1x 64GB Micro SD card (Nice touch!), 1x lens cleaning cloth, 1x rubber eye piece. It seems the only item not supplied is a charger for the 18650 batteries, although these are easy enough to buy online.
Features
Looking at just the scope now, working from front to back externally, we have a removable daytime reducer, this is vital for keeping the sensor covered during bright days. Once the sun sets it is simply screwed off to improve the image quality (More on that later). Behind this is the image focus wheel, conveniently marked for closer or distanced targets, a sensible addition in my eyes. Behind this is the Force Power Off button (marked P. Off), and the microphone. A large rubber button used as the main power on/off is located behind the microphone, after which the photo/video controls and Ballistic calculator/Exit buttons are placed. The prominent feature at the rear of the main controls section is the scroll wheel. This is used to navigate through the menus and clicked in acts as an ‘OK’ button. At the rearmost of the unit is the Dioptre Adjustment, used to bring the digital screen into focus. On the right-hand side of the unit are rubber covered slots for the Micro SD Card and the USB-C charging cable. On the Left-hand side is a Picatinny rail for external IR torches, lasers, and the like.
The unit is equipped with a Ballistic Calculator function, used to change the Point of Aim (POA) for distance shooting. There are a variety of pre-installed settings for animals on the unit, such as rabbit, fox, bear, dove, goat, and boar. There is also the ability to add a custom size, in increments of 0.1m. All animals are pre-sized at 1m, so will need some work to set at the correct heights. For our tests we’re using the average height of a rabbit, 20cm from foot to top of ear, and average fox height at around 42cm from foot to shoulder. A quick look at the range finder with the selected animal gives a stadia line that is adjustable for the height seen through the scope. Using the scroll wheel adjusts the length of the line, as well as displaying a drop marker, or adjusted POA. Provided the data inputted to the ‘BA’ tile of the menu, you should get a good shooting solution. A point to note is that the units are all metric, and the BC is measured with the G7 profile, Strelok Pro app for iPhone and Android has a good conversion facility for metric to imperial.
Video recording and photos are also a useful feature for recording your hunts. Automatic video can be calibrated for seconds before and after shot taken. Useful for not consciously pressing buttons and missing the ability to film your shots.
Mounting
The rifle used as a test bed is a CZ 527 Walnut Varmint with a 26” barrel. It’s fitted with a Britannia Rails 0MOA Picatinny rail, and MDT Clamp-on bolt knob. As a moderator I’m using a Wildcat Evolution with a G&F Tactical Moderator Cover. The normal night vision equipment on this rifle is the old-style ATN X-Sight II 5-20, powered by a 20,000mAh battery stored in the buttstock pouch. As you can see below, there a rather inconvenient wire wrapped around the stock, kept in place with sticky tabs. Not the greatest look, but it’s function. The main downside is the weight! Changing the scopes over was rather simple. The entirety of the old scope was removed, leaving behind the picatinny rail. I opted for the Cantilever mount for the Wulf 4K as it would be the better option for getting the eye relief set correctly. With the scope loosely fitted in the mount, but bolted tightly onto the rail, I used the datum level found from the rail to mount the scope perfectly parallel. Due to the profile of the Picatinny Rail I had to remove the recoil lug from the mount to achieve the correct eye relief. The rifle is only .223, so recoil shouldn’t affect it enough, this mount is snugged down a few lb/in extra to account for it.
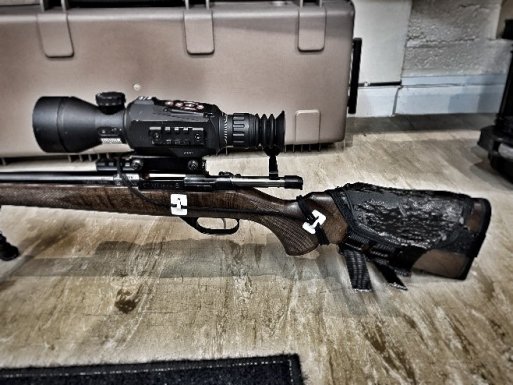
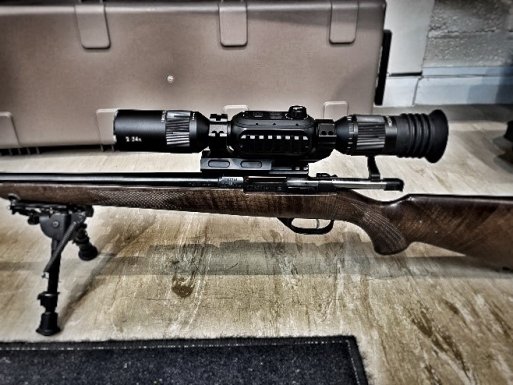
I have to say, the Wulf 4K looks much neater and tidier in comparison, it’s removed a lot of bulk from the rifle. The scope height above bore is not too different, as the Wulf 4K has a smaller objective size than the ATN X-Sight II, but this shouldn’t be an issue. The rifle is still comfortable to hold and shoot.
Zeroing
As with most digital Day/Night scopes, the zeroing function is much the same. I always bore-sight the rifle at either 50 or 100m before taking the first shot, saves the issue of “where on earth did that first shot land?!”, and is much safer doing so. Once the barrel is lined up with the target, the ‘COL’ tile is selected through the menu on the scroll wheel and a crosshair and set of co-ordinates is shown. This is the X and Y values in relation to the screen. You can only adjust one direction at a time, changing between X and Y with a click of the scroll wheel. When adjusting there is one crosshair left at the original POA, while you move the second set to the fall of shot. Pressing the ‘Exit’ button saves the co-ordinates and moves the main crosshairs.
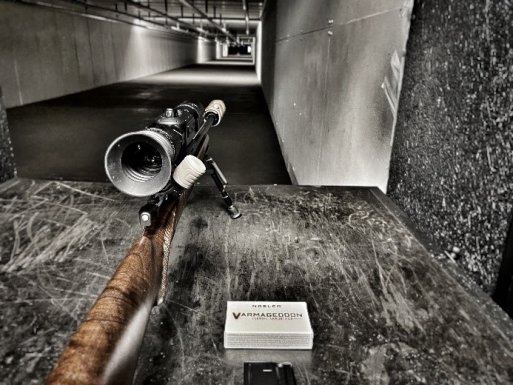
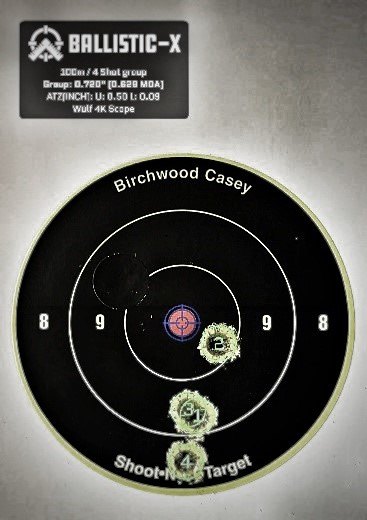
The ammo used in the test was Nosler’s Varmageddon 55gr Ballistic Tip in .223. As shown in the picture, the first shot was just off paper at 100m, high and left. As outlined above the adjustment process is simple. The crosshairs were moved from the POA to the fall of shot, and the following 4 shots are below. Except for one flyer (this is the first time this ammo has been used through this rifle), the ammo and the scope seem to like each other! I’ve done one final adjustment on the scope and it’s ready for the field test.
Out in the Field
Immediately the difference between the two scopes was very noticeable. The weight was considerably less, and the quality was significantly improved. I had no issues seeing clearly with the ATN X-Sight II, but there is an improvement in clarity with the Wulf 4K. I had no doubt about what I was looking at, up to around 600m. I was using a Wicked Light 65IR which provides incredible illumination for the scope, with a choice of 850nm and 950nm. The 850nm worked decidedly better than the 940nm.
The magnification worked extremely well, a little distortion in the image, as it is still a digital zoom, but I could still clearly identify what I was shooting. The range finding function was well thought out, I tested it at a known distance and known sized feature and the scope gave a reading that was a hundred or so metres out. This was double checked with a laser range finder and the scope’s value was incorrect.
The evening was an eventful one, seeing 6 or 7 foxes around the land. The scope worked well, allowing a clean shot to be taken from a set of trigger sticks to the target 200 meters away. The Field of View on the scope was ideal to be guided onto the target from my colleague using a thermal spotter.
I specific point I remember was my colleague spotting a heat signature in a field around 600m away, unsure of what exactly it was. I pulled the scope to where he was looking, focused my Wicked Light to the distance and could clearly make out the shape of a fox, and saw the bright reflective eyes looking back toward us. No shot was taken at this distance with my .223, but it was good to see the Wulf 4K could give the clarity to identify targets at distance.
Verdict (Pros & Cons)
+ Lightweight in comparison to the ATN X-Sight II, and other competitors
+ Very robust carry case
+ Good range of accessories included – Nothing else needed
+ Easy to zero
+ Simple design and ease of use
- Battery life only seemed to be around 4 hours, in comparison for the same price point, the ATN 4K Pro will last around 18 hours on a single charge
- IR Supplied needs upgrading for best results
There is no doubt this is a very capable day and night scope, it performed well on test and was able to keep a good zero. It was lightweight and robust with a simple User Interface for use in the field. I was confident with each shot taken due to the clarity and time taken in the range previously to confirm the scope’s zero. I would recommend this scope as a full package for anyone looking to start shooting at night with Infrared Night vision!
- 1st December 2021